MySQL is a well-established relational database management system. It is fully compatible with a Windows computer system. By using the MySQL Installer, an application designed to simplify the setup of MySQL products, MySQL can be installed and deployed within minutes.
The article is comprehensive, rich with images, and focuses on the individual steps needed to install and configure a MySQL server on a Windows machine. Hence fasten your seat belts and ride or will say read along.
Note: Please check your Browser or other settings, if images are not visible to you.
Please note that I am using mysql-installer-web-community-8.0.23.0.msi for the installation process. But your installer may produce same or similar screens, as I am using web installer in the article. So lets just try it.
I will be installing MySQL version 8.0.23, but you can use the method to install another or earlier version of MySQL like 5.7.x.
Prerequisites
- Administrator privileges on Windows server
- Windows computer system
Installation
Download MySQL Installer for Windows

|
Install and Configure MySQL Server
on Windows machine.
|
The MySQL Installer for Windows helps you control the installation process by providing a user-friendly interface. It also guides you through the steps needed to configure MySQL.
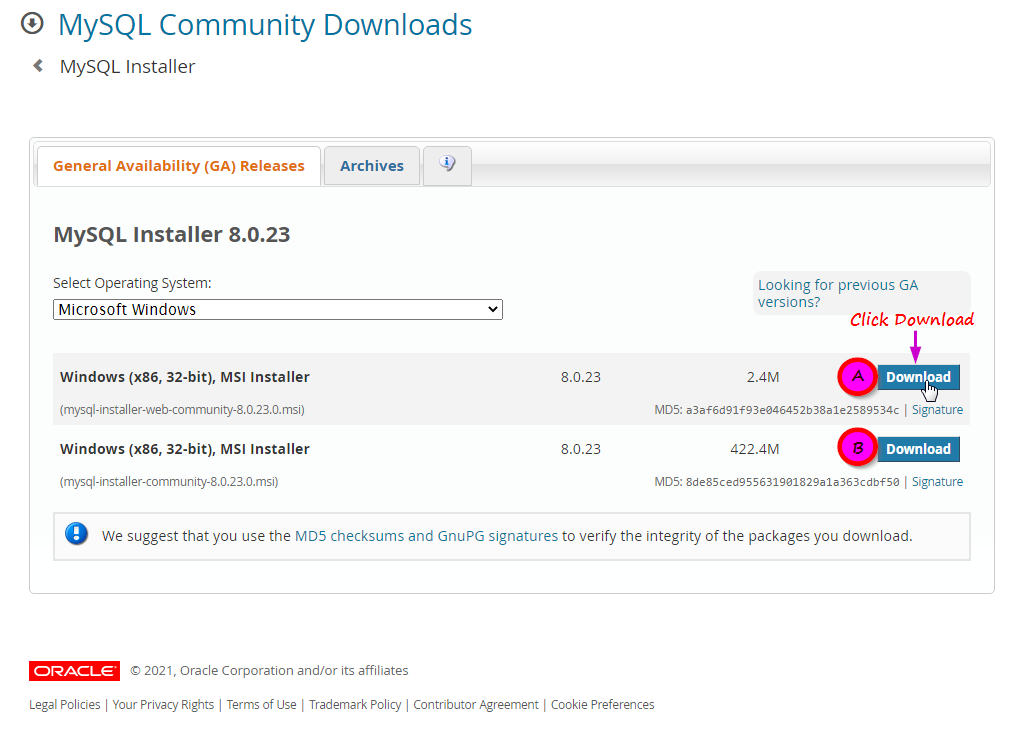
Access your Windows server/machine and download the MySQL Installer. A free Community edition MySQL Installer is available from the official page: Download MySQL Installer
You are given the option to download either the Web Community version or the Full MySQL package.
- The Web version (A) contains only the MySQL Installer and configuration files. You can customize and add additional MySQL products at a later point.
- The Full version (B) contains all MySQL Windows products, including the MySQL Server.
Select and download your preferred version. In this example, we selected the Web MySQL Package (A).
After selecting a version, you are provided with the option of signing up for a MySQL Community account. If you are not interested, select the No thanks, just start my download option at the bottom of the page.
By selecting this option, the download process starts immediately. Once the download is complete, you can execute the MySQL Installer file from the download folder, either by double clicking it or by using your preferred method.
Note: You need to go to the folder, where the installer has been downloaded, in order to run it, if set differently.
It can take a few moments while Windows configures the MySQL Installer and prepares the installation and configuration process. If it ask for or present User Access Control dialog box then click Run/Yes to continue further.
You might see below images that I encountered after running MSI installer.
Set Up MySQL Installer for Windows
After accepting the Oracle license agreement terms, the first screen that you encountered is the welcome screen for upgrading already installed product. Since I am not upgrading anything, hence Click Cancel and then Yes
for Dialog Box: Are you sure ... to cancel ...?
.
A little bit of wisdom.😉
Developer Default installs all the tools you need to develop and micromanage your MySQL databases effectively.
Server Only is used to install an instance of the MySQL Server and forgo other MySQL products.
Client Only installs all products except the MySQL Server and associated tools.
The Full configuration installs all available MySQL products.
A Custom setup allows you to select the individual elements that are to be installed and alter predefined default settings.
Then you will see a screen where in the left pane, MySQL products are mentioned and in the right pane, you will see different options for performing particular operations like Add..., Modify... etc.
Click on Add...
Then choose the MySQL server version you want to install. Select the product from left pane by clicking (+) down the line and then clicking (➞) arrow to send it to the right pane.
Click Next.
Then is the MySQL download screen. Since we are using web installer, hence MySQL need to download it first. Click Execute.
It will go into Downloading... status with progress indicator. Let the download be completed and then click Next.
At some point, the system tries to resolve possible inconsistencies. It might inform you that additional packages need to be installed for the process to continue (e.g., Microsoft Visual C++ 2019 Redistributable Package). You can also run into Path installation inconsistencies if you have previous MySQL installations on your Windows Server.
Luckily the MySQL Installer auto-resolves issues and installs the latest binary compatible version of missing software. It might be possible that you need to resolve the software dependencies manually. You are now ready to start the installation process in earnest. Click Execute to begin the installation process.
This will start the installation process. You will see installation is in progress.
Once the status of the installation status is labeled as Complete, click Next and then click Finish.
You can copy the logs if you want.
Now you are ready to configure the MySQL database server.
The MySQL Server 8.0.23 is now ready to be configured. Initiate the process by clicking Reconfigure.
Please respond to below screens as shown. It might be possible that some screens are not available for you, depending on the installer or options selected. Skip as applicable.
1. High Availability
This configuration option affects database availability. It allows you to decide if you want to set up a Standalone MySQL Server or an InnoDB server cluster to improve availability. In this instance, we selected the classic, single server option.
Click Next.
2. Type and Networking
The Type and Networking section is used to define several essential features.
The Config Type option lets you choose between three server configuration types. Development Computer, Server Computer, and Dedicated Computer: define whether the server is dedicated solely to running your MySQL database or is going to share the underlying system with other applications.
In this example, we decided to keep the setting as Development Computer.
The Type and Networking tab can also define the port the MySQL server is listening on. The default setting is port number 3306 and can be changed to suit your needs. Like I have used 3308 as I have other MySQL process (MySQL 5.5.x) listening on default port 3306.
By checking the Show Advanced and Logging Option box, you can set additional logging options at a later stage.
Click Next once you have selected the options, you feel meet your requirements.

3. Authentication Method
It is possible to choose between two authentication methods, the recommended Strong Password Encryption, and the Legacy Authentication Method. Select the recommended Use Strong Password Authentication option.
Click Next.
4. Accounts and Roles
You are now prompted to enter a password for your MySQL root user. You can also create additional roles for various users and purposes.
This is only an initial setup, and credentials can be edited once the installation is complete.
Choose and Enter a strong password. Do not look at mine if you see Weak. 😉
Click Next.
5. Windows Service
By defining MySQL as a Windows Service, it can now start automatically whenever the Windows system boots. You can change the behaviour later on from Services utility (Run -> services.msc) of Windows.
I have chosen the following additional options:
- Windows Service Name as MySQL80 (It is good to name the service explicitly.)
- Start the MySQL Server at System startup and
- Run Windows Service as ... Standard System Account
If you decide to start MySQL as an executable application, you would need to configure it manually.
Click Next.
6. Logging Options (Optional)
If you have selected the Show Advanced Logging option in the Type and Networking tab, you are now able to set up MySQL log preferences.
Logging options let you select the types of logs you want to activate and define the log directories. You can change the directories and name of the files if you wish.
Click Next to reach the Advanced Options section.
7. Advanced Options (Optional)
Advanced Options include setting a unique server identifier, and the type of case (Lower/Upper) to be used for Table Names.
These settings are only available if you have checked the Show Advanced Options box in the Type and Networking tab.
Server ID. This variable specifies the server ID. server_id is set to 1 by default. The server can be started with this default ID, but when binary logging is enabled, an informational message is issued if you did not set server_id explicitly to specify a server ID.
For servers that are used in a replication topology, you must specify a unique server ID for each replication server, in the range from 1 to 232 - 1. "Unique" means that each ID must be different from every other ID in use by any other source or replica in the replication topology.
If the server ID is set to 0, binary logging takes place, but a source with a server ID of 0 refuses any connections from replicas, and a replica with a server ID of 0 refuses to connect to a source. Note that although you can change the server ID dynamically to a nonzero value, doing so does not enable replication to start immediately. You must change the server ID and then restart the server to initialize the replica.
Click Next.
8. Apply Configuration
You have successfully configured the MySQL server and need to confirm for the MySQL Installer to apply the configuration.
An overview of the configurations steps appears on the screen. Click Execute to apply the configuration.
You can see that the selected configurations are being applied.
If you get any errors in this process, please resolve them either by searching google or any other means available to you. Common error can be directory permissions. I believe Log tab can help you here. You can even copy the execution logs from there.
Complete MySQL Installation on Windows Server
If all goes well your configurations has been applied.
Click Finish to complete the MySQL server installation on Windows.
Close the web installer.
You can check that the service is up and running using services.msc. Note that we configured the MySQL service name as MySQL80.
Conclusion
Installing MySQL on a Windows server is simple when using the MySQL Installer tool. The configuration process has many available options that are significantly easier to navigate by following the stages outlined in this article.
The same methods can be used to install or upgrade various MySQL products as well as alter existing configurations at a later point.


Comments
Post a Comment